So, you’ve decided to remodel your kitchen. You’ve set aside a budget. You’ve settled on a kitchen design company. You’ve booked an appointment.
Your new designer asks you to send them your kitchen’s measurements.
“Come again?” you ask, wondering where your old tape measure might be.
No need to worry—this article is a user-friendly guide written especially for the first-time home renovator. By the end of this page, you'll have all the information you need to measure your kitchen like a pro. You don’t even need to be good with numbers.
Let’s get started!
Measuring Your Kitchen for the First Time
Have no fear: measuring your kitchen is a straightforward task that you should be able to complete in thirty minutes to an hour.
Before you start, make sure you have these few items handy:
- A tape measure (we’ll be measuring in inches)
- A pencil
- Grid paper (blank paper can work too, but the printed lines on grid paper will make everything neater)
That’s it! You’re ready to start. We told you this would be easy.
To make things even easier, download a free kitchen measurement worksheet—on us!

Sketching the Floor Plan
The floor plan is a simple bird’s-eye view diagram of your kitchen.
Remember, there’s no need to play Picasso here. Your designer doesn’t expect a masterpiece. As long as your diagram is clear and its measurements are accurate, the sketch is a success!
We recommend sending pictures of your kitchen from all angles to your designer along with your rough floor plan. That way, your designer can eyeball measurements if you’ve missed any—at least until they can verify them professionally.
Of note, your builder’s original kitchen plan is not a sufficient substitute for a floor plan.
To sketch the floor plan, you need to:
- Draw the shape of the room.
- Mark all openings in the room (doors, windows, and wall openings).
- Measure the full length of each wall.
- Measure the walls by section.
- Mark all fixtures in the room (gas lines, water lines, electrical outlets, etc.).
Let’s break these steps down into even more detail.
#1: Draw the shape of the room
The first step is the easiest. Draw the shape of the room simply. Some kitchens are L-shaped, some are U-shaped, and some are simple rectangles.
Imagine your house was a toy model and you sawed the roof clean off. With the roof gone, you’d be able to look straight down into the kitchen with an aerial perspective. You’d see the tops of your fridge, stove, and counters. You’d even see the width of the walls. That’s the view you’re looking to achieve in a floor plan.
By the end of step #1, a plain and simple rectangular kitchen should look something like this:
.jpg?width=426&name=Floor_Plan%20(1).jpg)
#2: Mark all openings in the room (doors, windows, and room openings)
Mark the positions of doors, windows, and room openings with lines. Aim to make each marking roughly proportionate, but if you’re drawing by hand, don’t stress too much about getting everything perfectly to scale. The measurements will indicate each element’s proportions. The visual aspect is a gauge, and nothing more.
For doors, don’t forget to indicate the direction in which they open with a line.
Add any protrusions, like alcoves or pantries into the sketch.
By the end of step #3, your drawing will loosely resemble this example:
.jpg?width=607&name=Floor_Plan%20(3).jpg)
#3: Measure the full length of each wall
Working clockwise so as not to miss anything, measure the full length of each wall. That means starting from one adjoining corner to the next. In most kitchens, you’ll need to maneuver the measuring tape over existing cabinets and other obstructions.
We recommend labeling each full-length wall with a letter (ie. Wall A, B, C, and D). These labels will be useful later when you draw the elevation plan.
Record each measurement on your floor plan, rounding to the nearest eighth of an inch.
Double-check your measurements before moving to the next wall!
If you’re using an online design software, feel free to use whatever measurement scale you prefer. Generally, it’s best to stick to inches as a unit of measurement though, since the imperial system is widely used in the kitchen design industry.
In the following example, we’re using a ¼” = 1’- 0” scale:
.jpg?width=607&name=Floor_Plan%20(4).jpg)
#4: Measure the walls by section
Once you have the full-length measurements for each wall in the room, the next step is to measure all the small sections within each wall. For example, let’s say you have one wall with two windows. On such a wall, there will be seven individual segments you’ll need to measure:
- The left-hand corner of the wall to the left-hand edge of the first window casing.
- The length of the first window (casing to casing).
- The depth of the first window.
- The right-hand edge of the first window casing to the left-hand edge of the second window casing.
- The length of the second window (casing to casing).
- The depth of the second window.
- The right-hand edge of the second window casing to the right-hand corner of the wall.
Always include window casings and door trims in your measurements.
Once you’ve penciled in your wall segment measurements, your plan will look a little bit like this:
.jpg?width=691&name=Floor_Plan%20(5).jpg)
Remember: appliances count as segments, too! If you intend on keeping your appliances, you’ll need to include their respective centreline measurements.
If you have the items’ brand and model specifications, even better. Send the manufacturer’s spec sheet to your designer as well.

Measuring centrelines
The centreline is an important kitchen measurement. A centreline is a measurement from the corner of a wall to the centre of an appliance or a fixed feature.
Add all necessary centrelines to your plan, as seen below with an example of a stove:
.jpg?width=691&name=Floor_Plan%20(6).jpg)
#5: Mark all fixtures in the room
Finally, mark the structural fixtures in the room that won’t be altered. For instance, draw in the location of utilities like water lines, gas lines, electrical outlets, and junction boxes.
.jpg?width=626&name=Floor_Plan%20(7).jpg)
If you don’t know all of this information, don’t worry. Mark down what’s externally visible and your designer will get the other details at a later date.
If there’s a fixture you want to be moved during the renovation, make sure to relay this information to your designer.
Congratulations! Your floor plan is complete! Now, all that’s left to do is a floor-to-ceiling diagram and you’ll be all set.
Kitchen Elevation Drawing
The final step to completing your kitchen measurements is drawing an elevation plan. In other words, a diagram of each wall from floor to ceiling.
Basically, for this step, you need to draw a face-on view of each wall, showing the:
- Height and width of each window (including casing).
- Height and width of each door (including casing).
- Height of the ceiling.
Ultimately, an elevation plan should look a little bit like this:
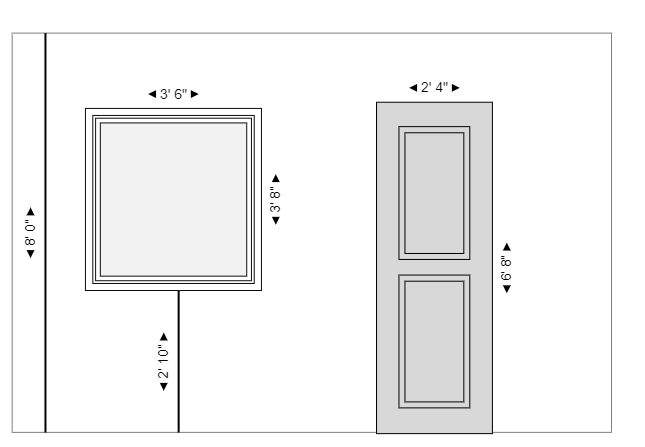
Sketch and label each wall using the letters you assigned to them in the floor plan.
Measuring the ceiling
Your kitchen’s ceiling height is an oft-forgotten measurement. Many clients forget to include it in their plan—don’t be one of them! Your designer needs to know your kitchen’s ceiling height to determine the appropriate cabinetry height. A simple mistake in ceiling height can translate to thousands of dollars’ worth of design and product changes.
We recommend taking 3-5 different ceiling measurements from different areas of your kitchen. Measure from the middle of the room, as well as various corners. Believe it or not, homeowners often find discrepancies! Use the smallest measurement you find.
Working With Your Designer
Accurately measuring your floor plan is critical because your designer will rely on your measurements to create a full preliminary design concept. Of course, if an essential detail is lacking, there’s no need to panic: you’ll have ongoing contact with your designer via phone and/or email throughout the whole process.
After you’ve met with your designer and have fallen head over heels for your new kitchen design, your designer will coordinate a convenient time to visit your home and professionally verify the measurements.
From there, your kitchen project will really get moving!
Schedule a Free Design Consultation
Designing a kitchen is a very complex overall project with a lot of moving parts. As a first-time home renovator, the task of creating a floor plan can seem stressful.
Follow our tried-and-true steps, and you’ll be a measurement wizard in no time! And if you need some guidance along the way, Deslaurier is always happy to lend a hand.
The Deslaurier brand is built on customer satisfaction. We emphasize collaboration and communication from beginning to end. We’re an A+-rated, Better Business Bureau-accredited company with 42 years of know-how behind us.
We offer 100% complimentary design consultations in Jupiter, FL for prospective clients—why not book yours today? To become an authorized Florida dealer, head over to our Become a Dealer page.
|
Related Links |